Homemade Waffles: A Breakfast Solution for Busy School Mornings
Mornings during the school year can be a whirlwind of activity, leaving little time for elaborate breakfasts. But what if you could have a delicious, homemade breakfast ready to go, even on the busiest of mornings? With a bit of planning, you can make a batch of homemade waffles, freeze them, and enjoy a quick and satisfying breakfast all week long. Here’s how to make and store these delicious waffles, including a handy tip for doubling the recipe.
Homemade Waffles Versus Store Bought
Making homemade waffles is important because it allows you to control the ingredients and avoid the preservatives and additives often found in processed versions. You can choose high-quality, wholesome ingredients, adjust sugar and fat levels, and experiment with flavors to suit your taste. This not only enhances the freshness and flavor but also enables you to create a healthier meal tailored to your dietary needs.
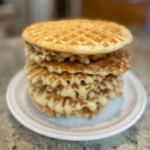
Having homemade waffles in the freezer is a convenient and delicious way to enjoy a quick breakfast. After preparing a batch, simply let them cool, then stack and store them in an airtight container or freezer bag. When you’re ready to indulge, just pop a waffle in the microwave for a minute or two, and you’ll have a warm, tasty treat in no time. This simple process allows you to skip the processed options while still enjoying the ease of a ready-to-eat meal, making it easy to savor homemade goodness even on the busiest mornings!
Homemade Waffles: A Breakfast Solution for Busy School Mornings
Cuisine: BreakfastDifficulty: Easy6
servings15
minutes5
minutesThese homemade waffles are light, fluffy, and golden brown, offering a perfect balance of crispiness on the outside and tenderness on the inside. Infused with a hint of vanilla, each bite delivers a delightful sweetness that complements a variety of toppings, from fresh fruits and whipped cream to syrup and nut butters. Their versatility makes them an ideal canvas for creativity—whether you prefer a classic breakfast or a decadent dessert, these waffles can be customized to suit any occasion. With the option to freeze and reheat, they provide a convenient yet indulgent treat that can be enjoyed any time of day!
Ingredients
2 cups all-purpose flour
1 teaspoon salt
4 teaspoons baking powder
2 tablespoons granulated sugar
2 eggs
1 1/2 cups warm milk
1/2 cup butter, melted
1 teaspoon vanilla extract
Directions
- Preheat Your Waffle Maker: Begin by preheating your waffle maker according to the manufacturer’s instructions. This ensures it’s hot and ready to cook the waffles to perfection.
- Mix Dry Ingredients: In a large bowl, whisk together the flour, salt, baking powder, and granulated sugar until well combined. This step ensures that the leavening agents are evenly distributed throughout the batter.
- Combine Wet Ingredients: In another bowl, beat the eggs. Then add the warm milk, melted butter, and vanilla extract. Mix until well combined.
- Combine Wet and Dry Ingredients: Gradually add the wet ingredients to the dry ingredients, stirring just until combined. Be careful not to over-mix; a few lumps are okay. Over-mixing can result in dense waffles.
- Cook the Waffles: Pour the batter onto the preheated waffle maker, using a ladle or measuring cup to pour the desired amount. Close the lid and cook according to your waffle maker’s instructions. Typically, this takes about 3-5 minutes, but times may vary based on your appliance.
- Cool and Freeze: Once the waffles are cooked, transfer them to a cooling rack to cool completely. This helps prevent them from becoming soggy. After they’re cooled, stack
Notes
- You can easily substitute ingredients in this waffle recipe to suit your personal preferences or dietary needs, such as using whole wheat flour instead of all-purpose flour for added fiber, or substituting almond milk for regular milk for a dairy-free option. Additionally, feel free to adjust the sweetness by using a natural sweetener like honey or maple syrup in place of granulated sugar.

